linux mail server
Linux Ubuntu 22.04 에서 Postfix Mail Server 를 설치하고 구성하는 방법

1. AWS Route 53 에서 레코드 추가
Linux 사용자를 추가하고 관리자 그룹에 추가하자.
adduser demo
usermod -aG sudo demo
hostname 을 변경해야 한다.
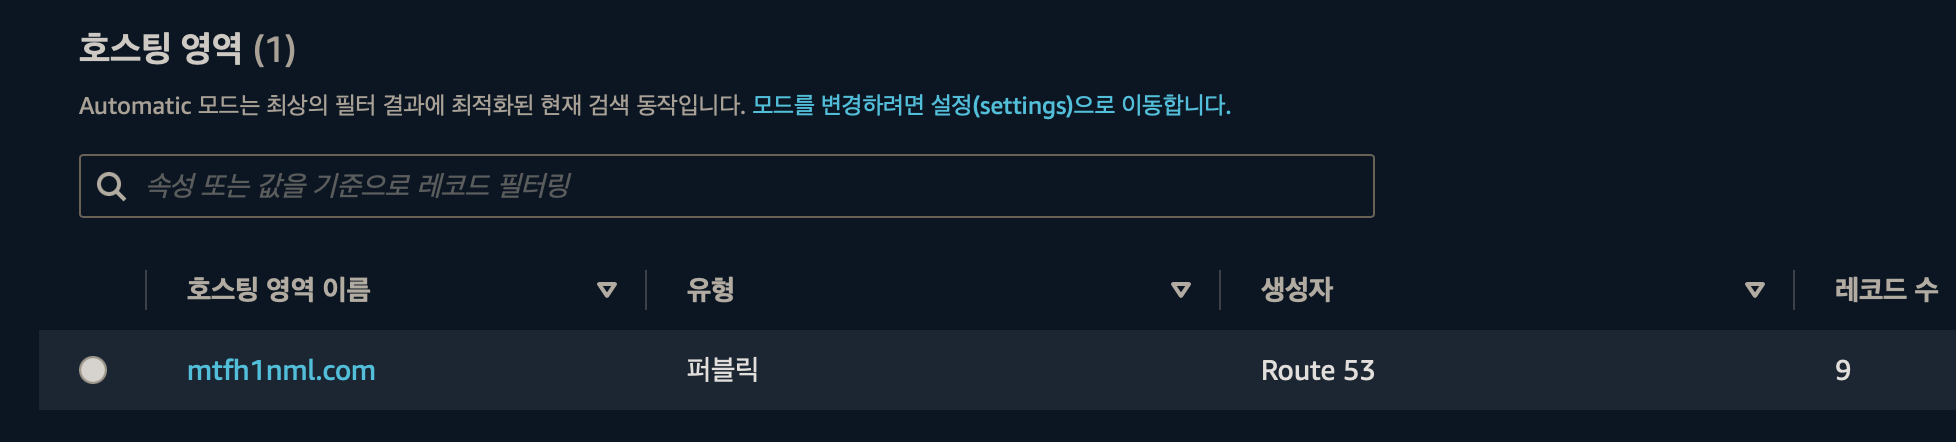
sudo hostnamectl set-hostname mtfh1nml.comAWS Route 53 에서 호스팅 영역을 생성하자. 도메인 이름만 입력하면 된다.
호스팅 영역을 생성하면 네임서버 목록을 확인할수 있다.
https://www.namecheap.com 으로 가서 Account > Dashboard
도메인 목록에서 MANAGE 를 누르자.
NAMESERVERS 항목의 Custom DNS 에 AWS Route 53 에서 확인한 name server 들을 입력하자.
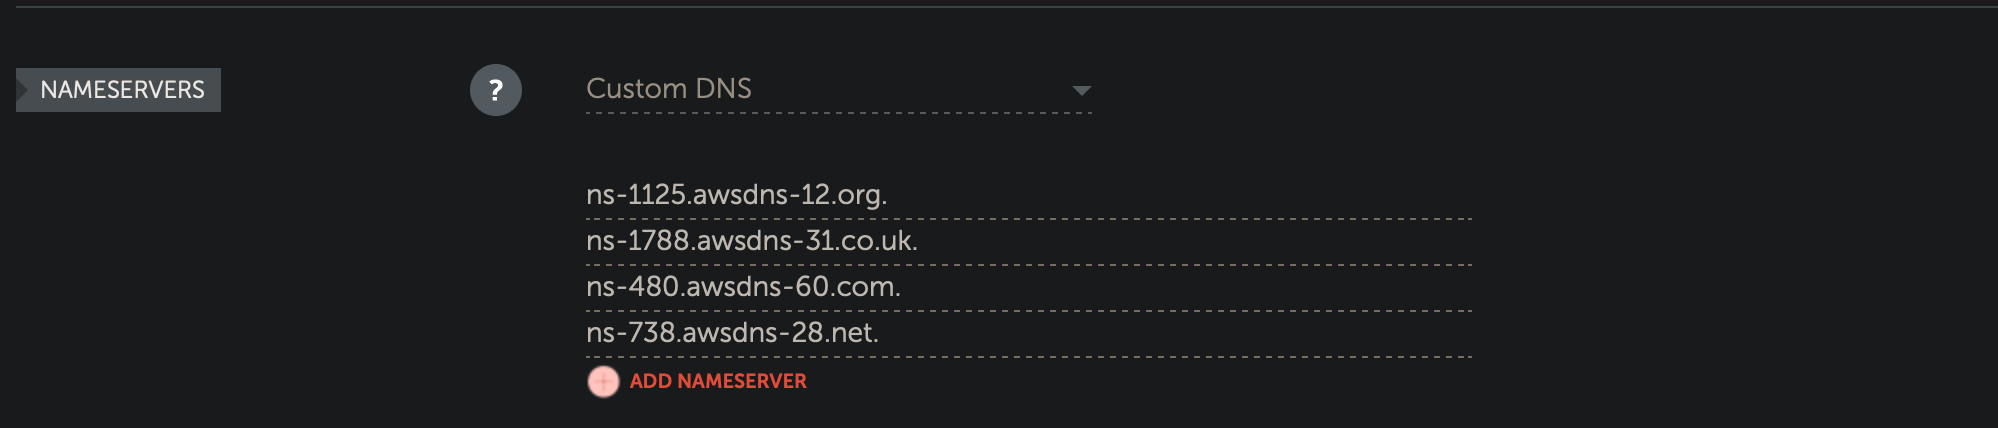
칼리에서 아래 명령어로 name server 등록이 잘 되었는지 확인해 보자.
nslookup -type=NS mtfh1nml.com이제 레코드를 추가하자.
mtfh1nml.com 에 대한 A record 추가
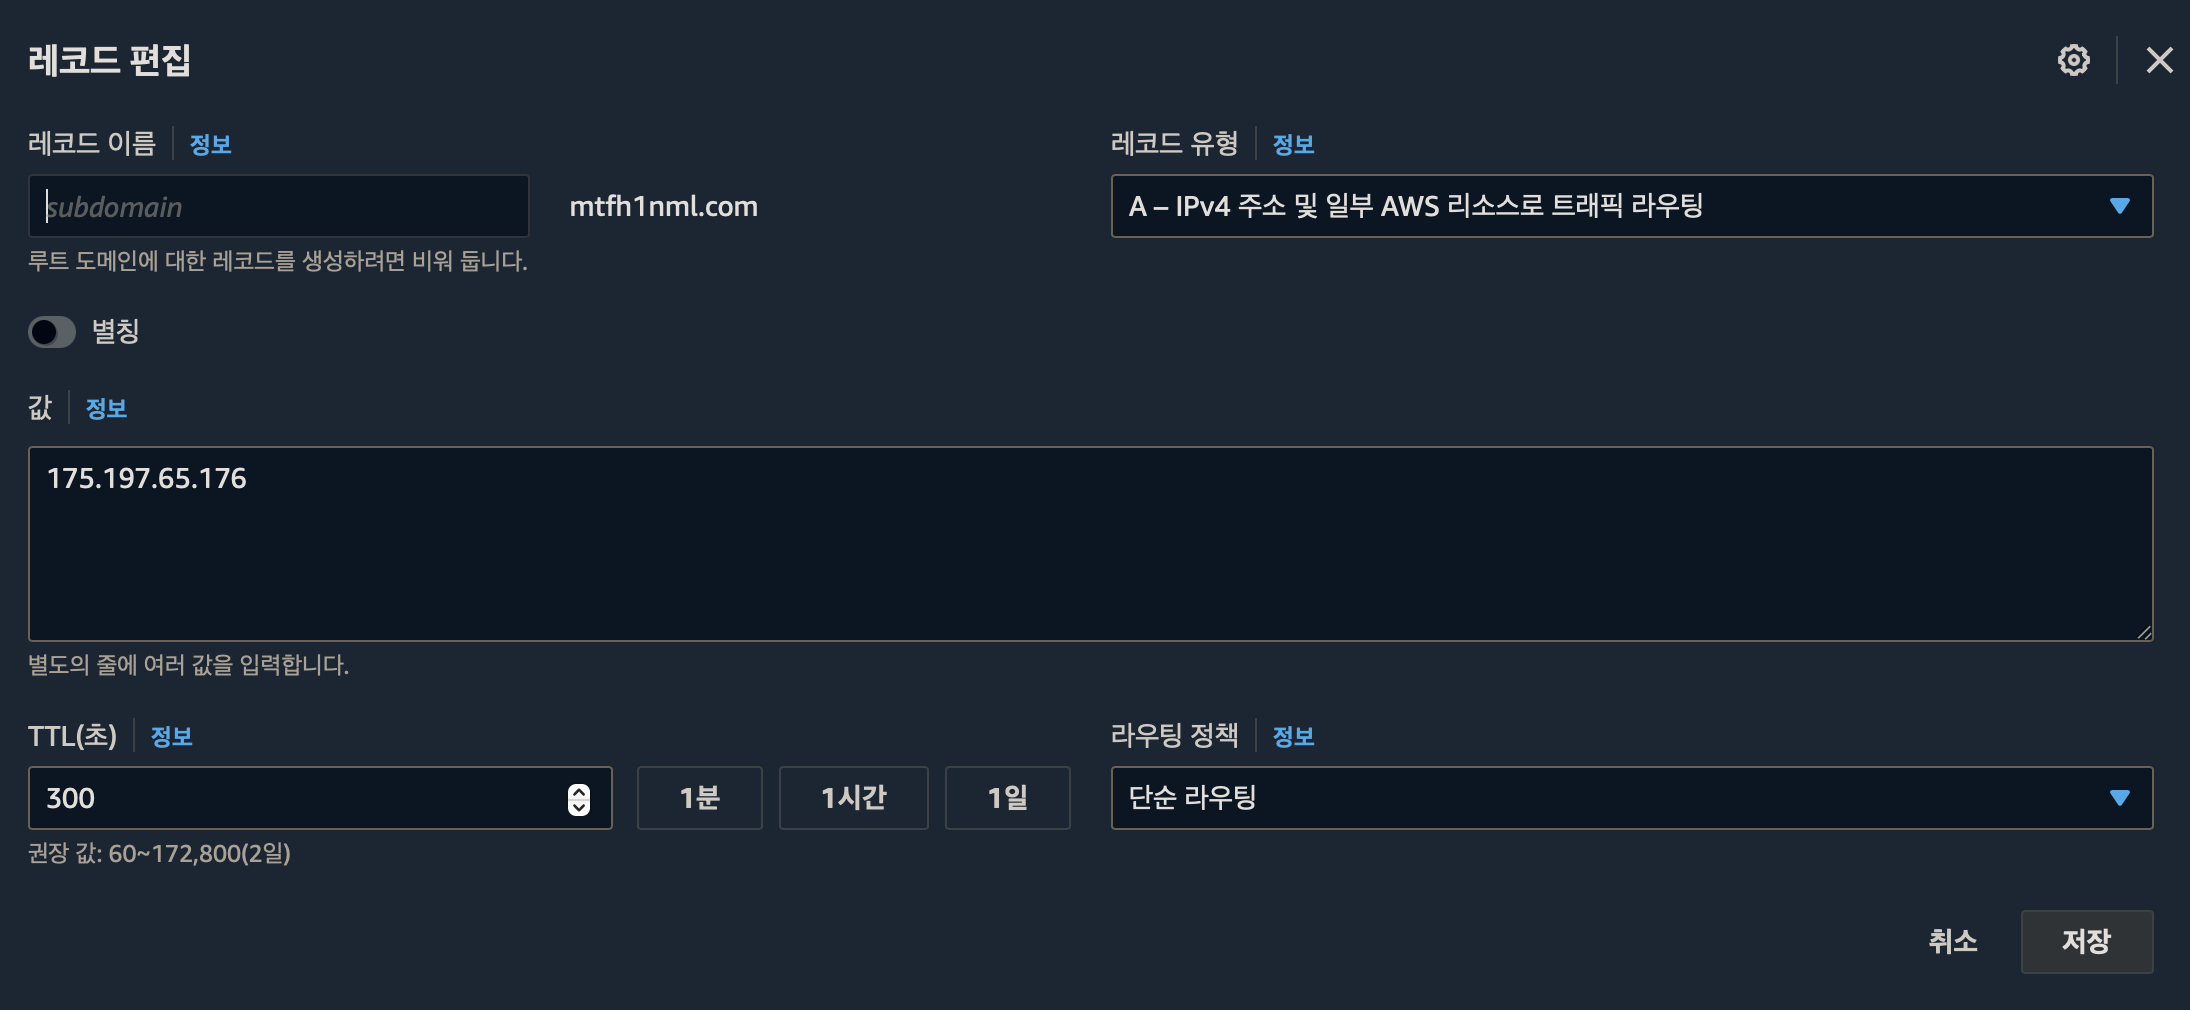
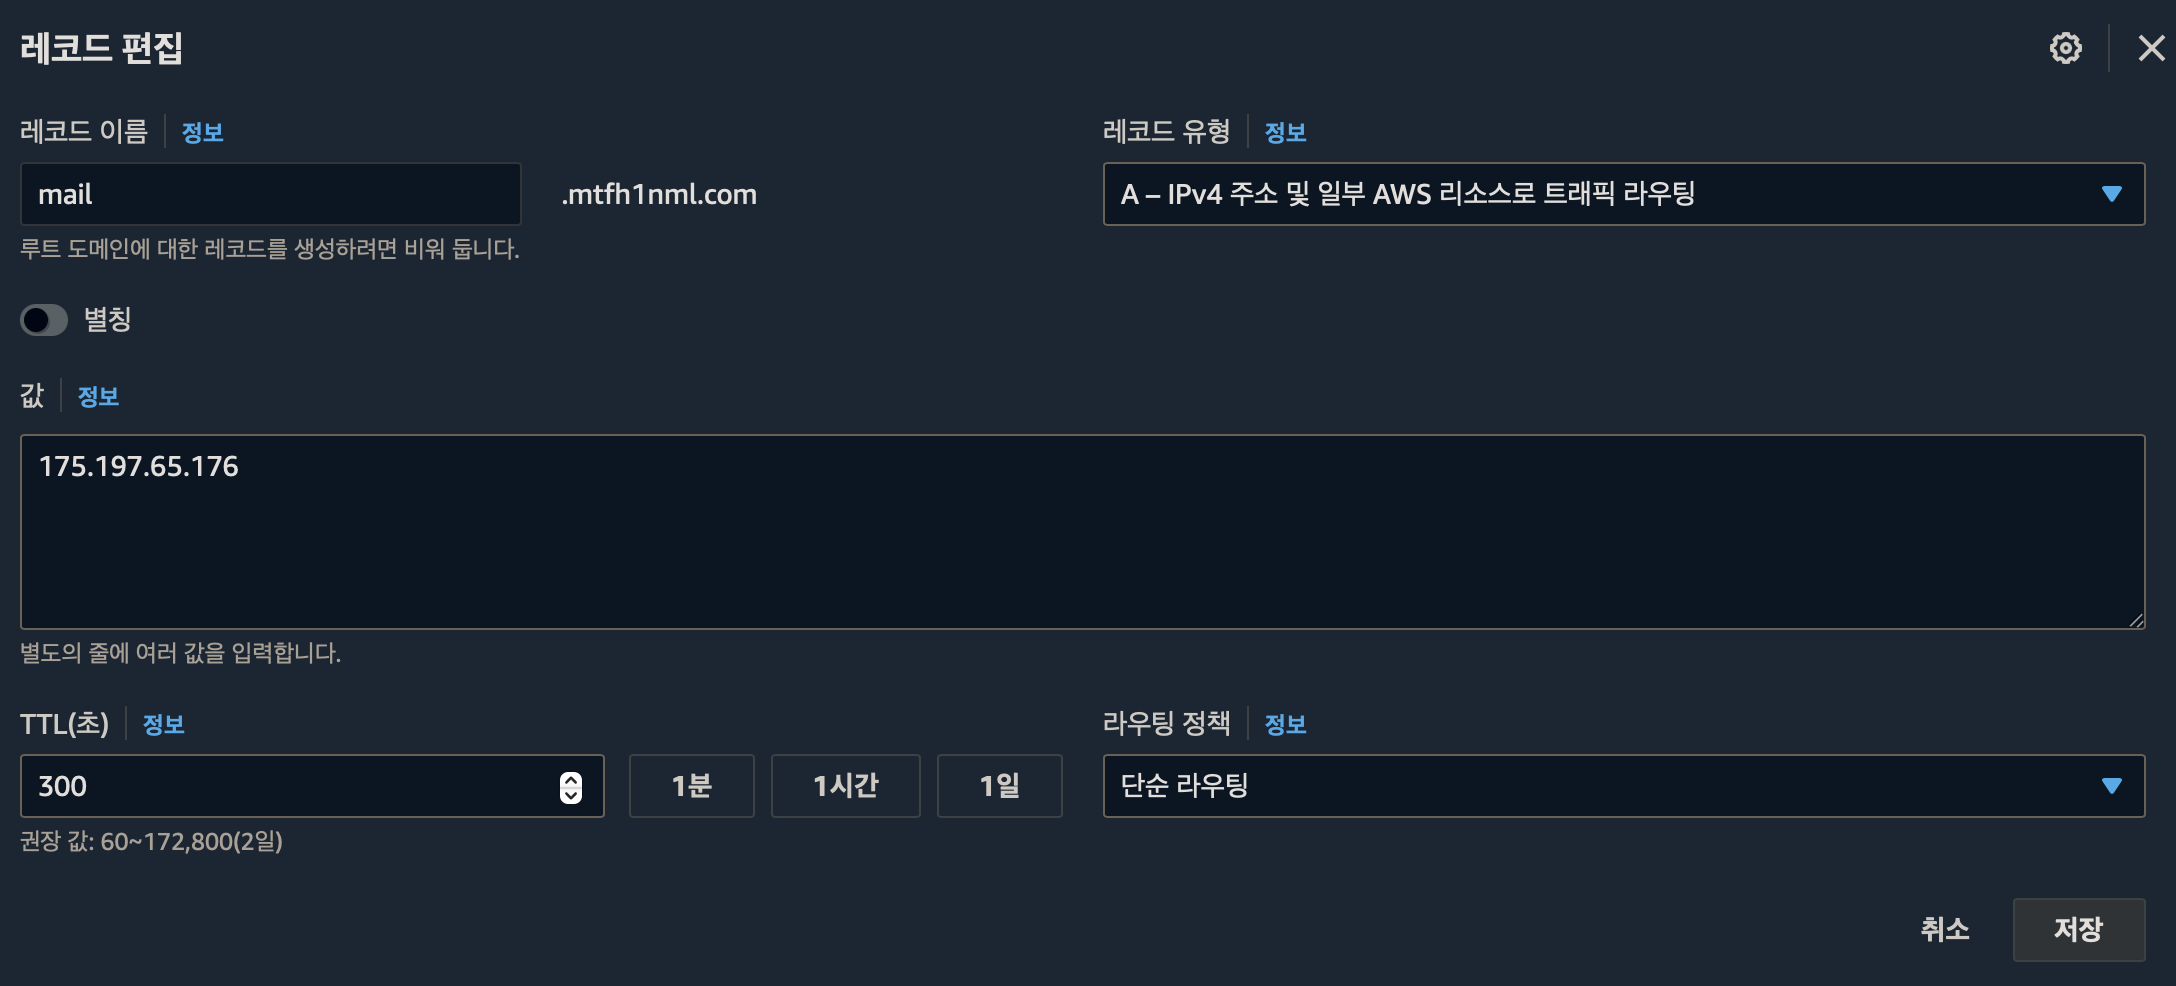
mail.mtfh1nml.com 에 대한 A record 추가
아래는 A record를 검색하는 명령어 이다.
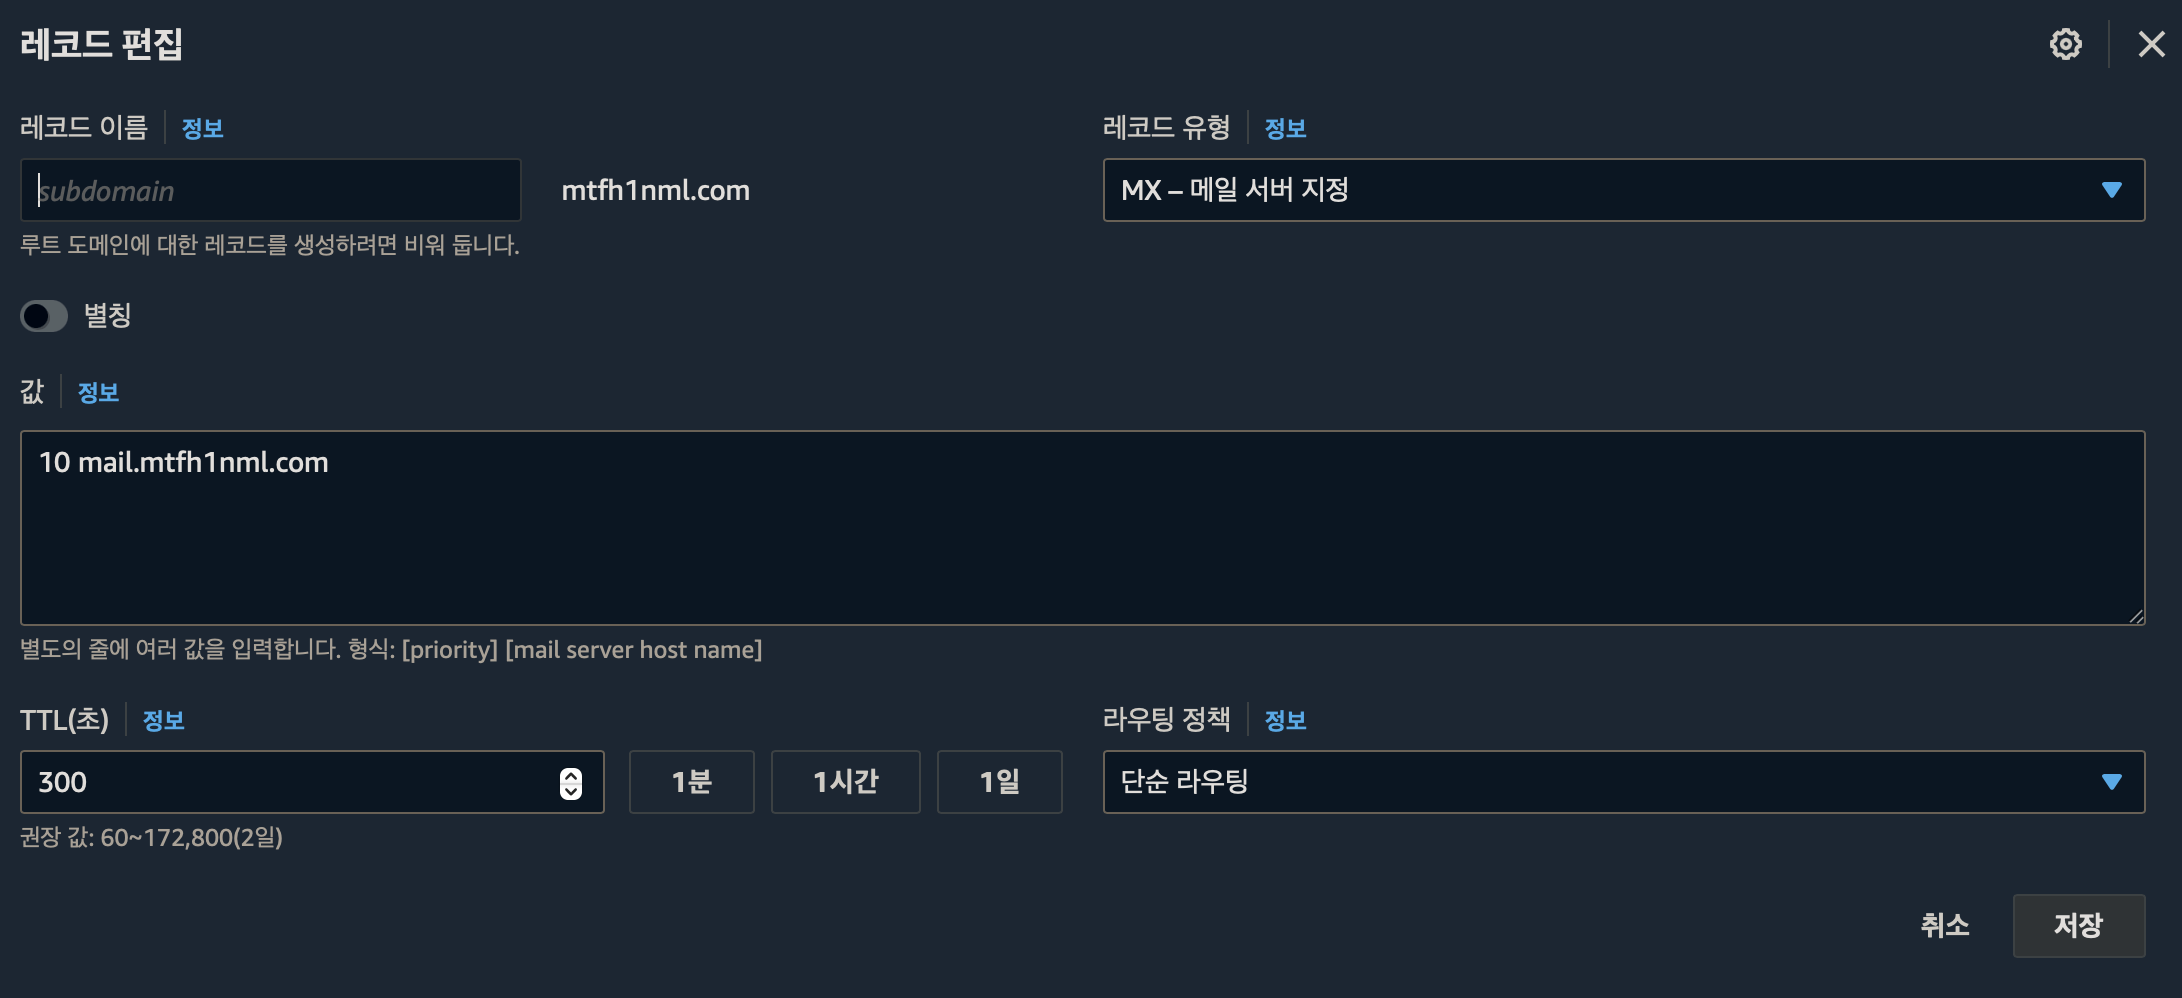
nslookup -type=A mtfh1nml.commail server 지정을 위한 MX record 추가
2. postfix 설치
sudo apt-get install postfixInternet Site 선택 > System mail name: mtfh1nml.com
sudo systemctl status postfix아래 명령어로 설정을 추가하자.
sudo dpkg-reconfigure postfixInternet Site 선택 > System mail name: mtfh1nml.com > Recipient for root and .. : "" > mtfh1nml.com, mtfh1nml.com, localhost.com, , localhost > Force sync... : No > Local networks: default 로 > Mailbox size ... : 0 > + > all
25번 포트가 잘 나가는지 확인해 보자.
telnet gmail-smtp-in.l.google.com 25연결되면 quit 로 종료하자.
apt install mailutils메일전송 테스트를 하자.
/usr/sbin/sendmail kshxxthm@gmail.com
test send mail
ctrl+d 를 누르면 메일이 전송된다.
메일은 google 에서 차단한다.
추가 설정이 필요하다.
우선 다음을 확인하자.
보내는 메일은 /var/mail/root 에 기록된다.
계정별로 저장 하려면 설정을 변경해야 한다.
sudo nano /etc/postfix/main.cf맨 마지막 줄에 다음을 추가하자.
home_mailbox = Maildir/이제 /home/demo/Maildir/new 폴더에서 전송한 메일을 확인할수 있다.
3. dovecot 설치
메일을 받기위해 dovecot 을 설치하자.
sudo apt-get install dovecot-imapd dovecot-pop3d설치가 완료 되면 실행해보자.
sudo systemctl restart dovecotdovecot.conf 파일을 수정하자.
nano /etc/dovecot/dovecot.conf맨 마지막 줄에 다음을 추가하자.
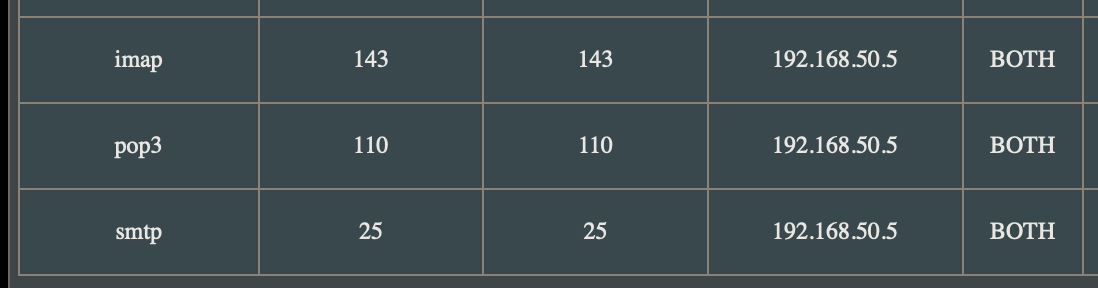
protocols = pop3 pop3s imap imaps외부에서 메일을 받으려면 포트 포워딩을 해야 한다.
4. opendkim 설치
메일이 외부로 잘 전달 되려면 추가적인 설정이 필요하다.
아래의 record 들을 추가하자.
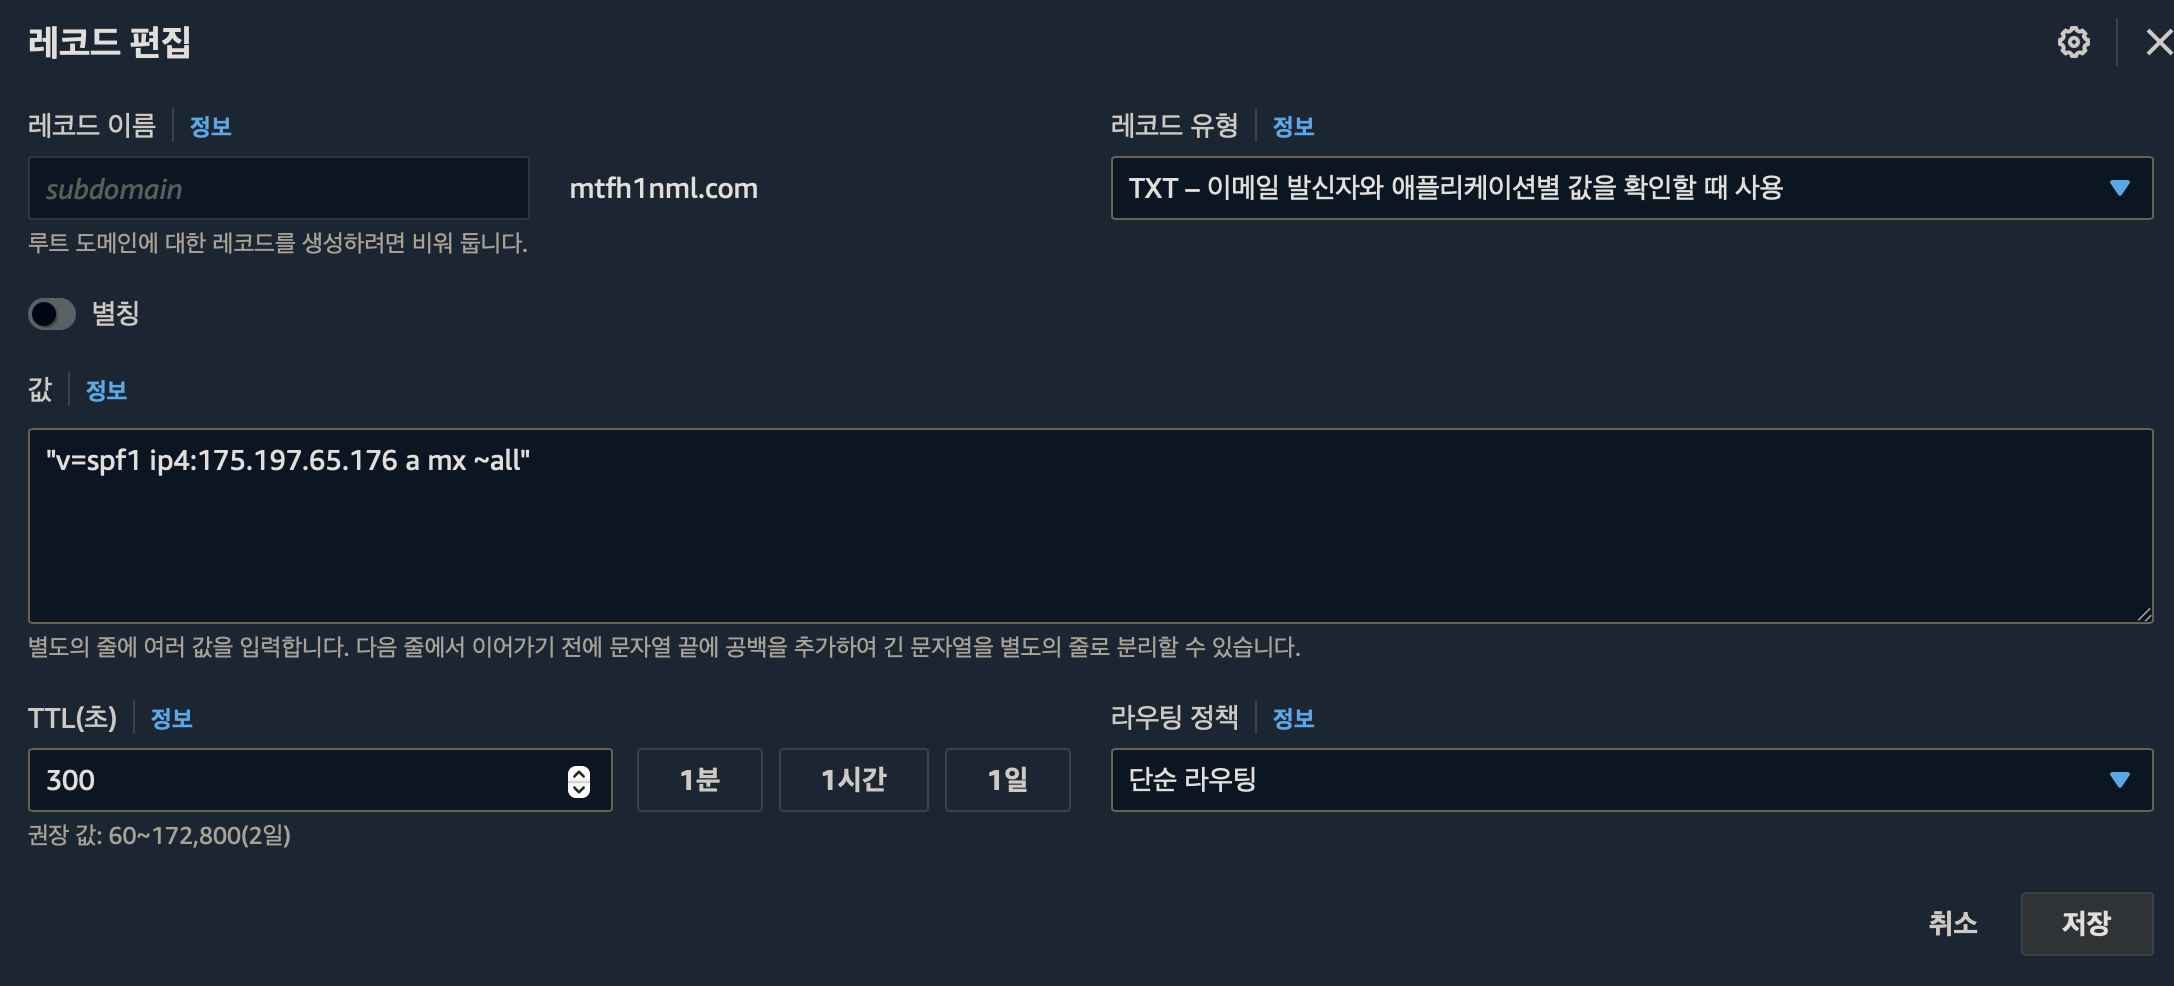
"v=spf1 ip4:175.197.65.176 a mx ~all"참고로 postfix 서버를 relay 서버로 해서 구글 smtp를 이용하는 경우에는 아래 spf 레코드를 이용했다.
v=spf1 ip4:175.197.65.176 include:_spf.google.com -all
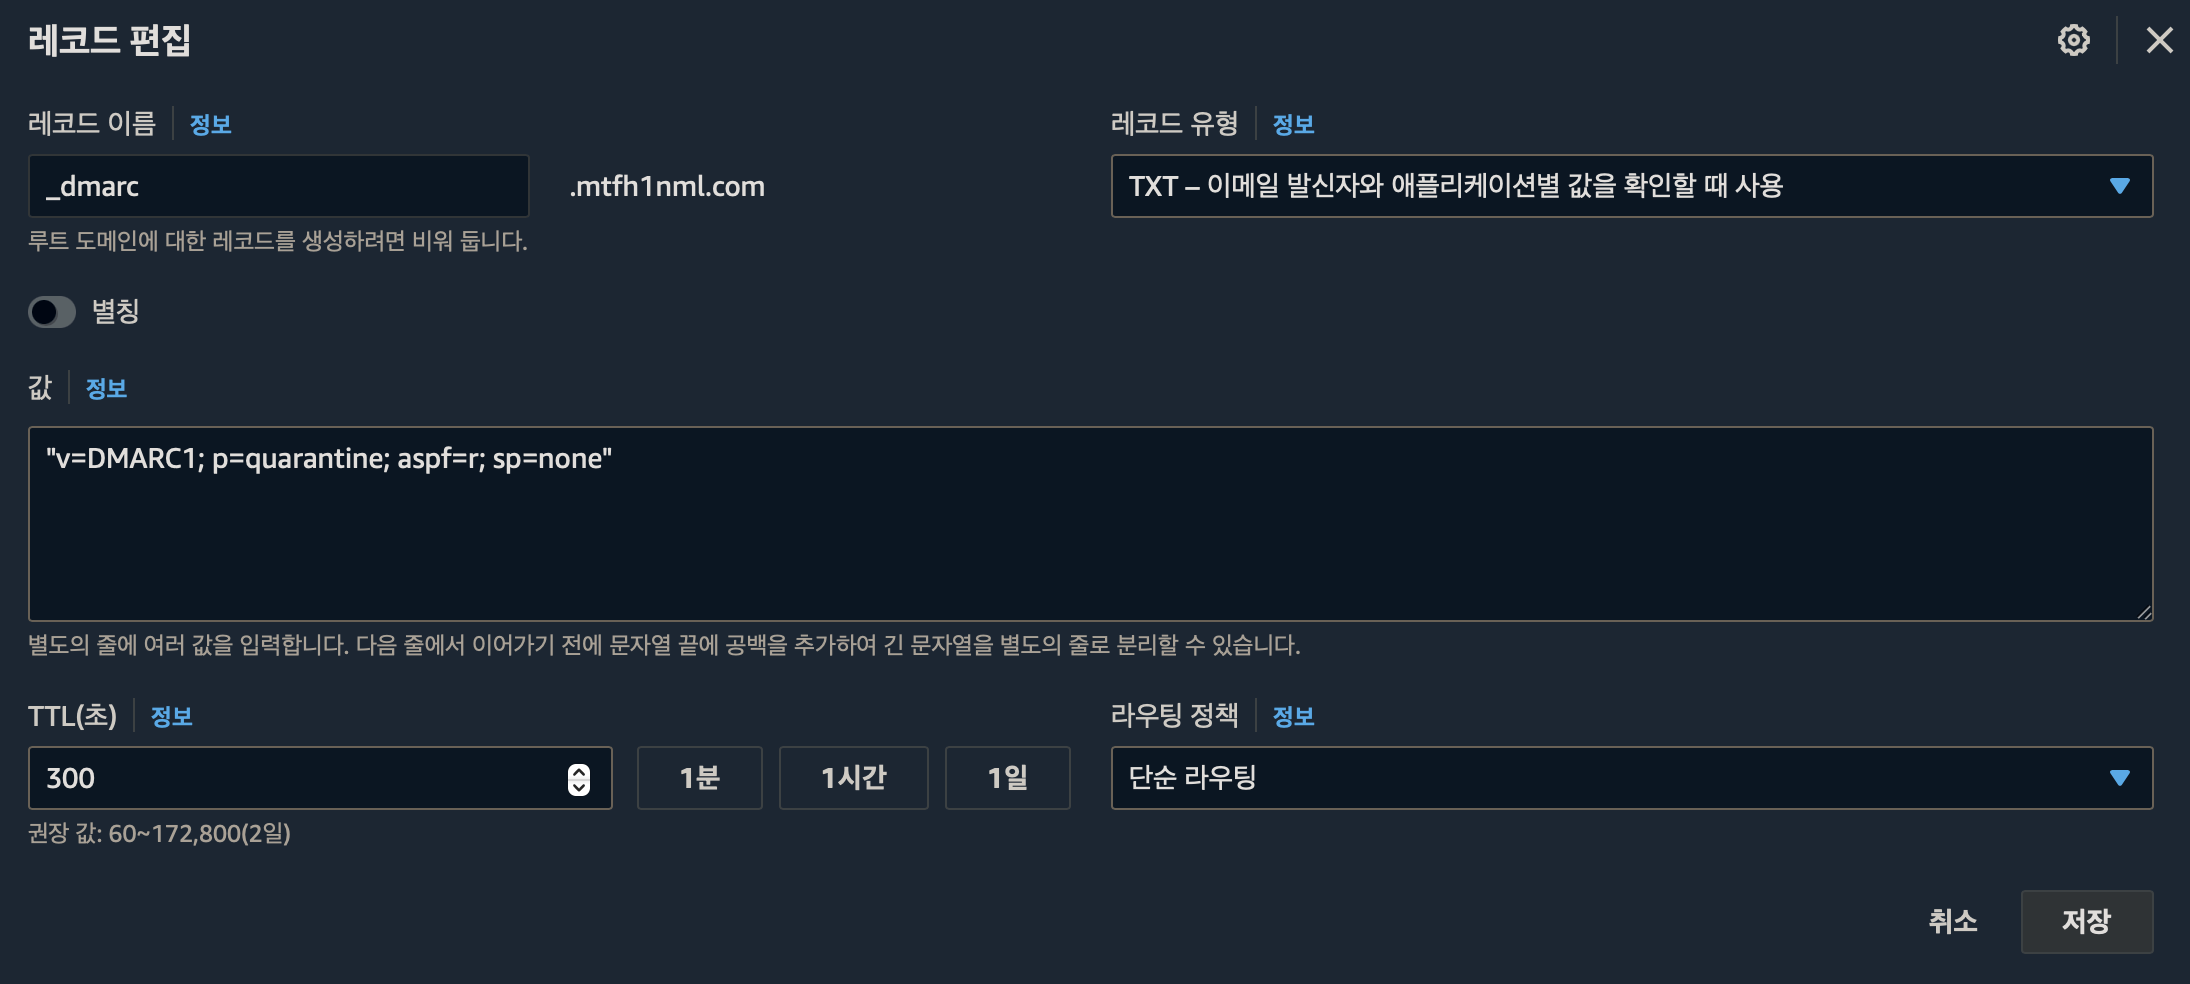
"v=DMARC1; p=quarantine; aspf=r; sp=none"opendkim 을 설치하자.
apt-get install opendkim opendkim-toolssudo systemctl start opendkim
sudo systemctl enable opendkim
mkdir /etc/opendkim
opendkim-genkey -D /etc/opendkim/ --domain mtfh1nml.com --selector mail
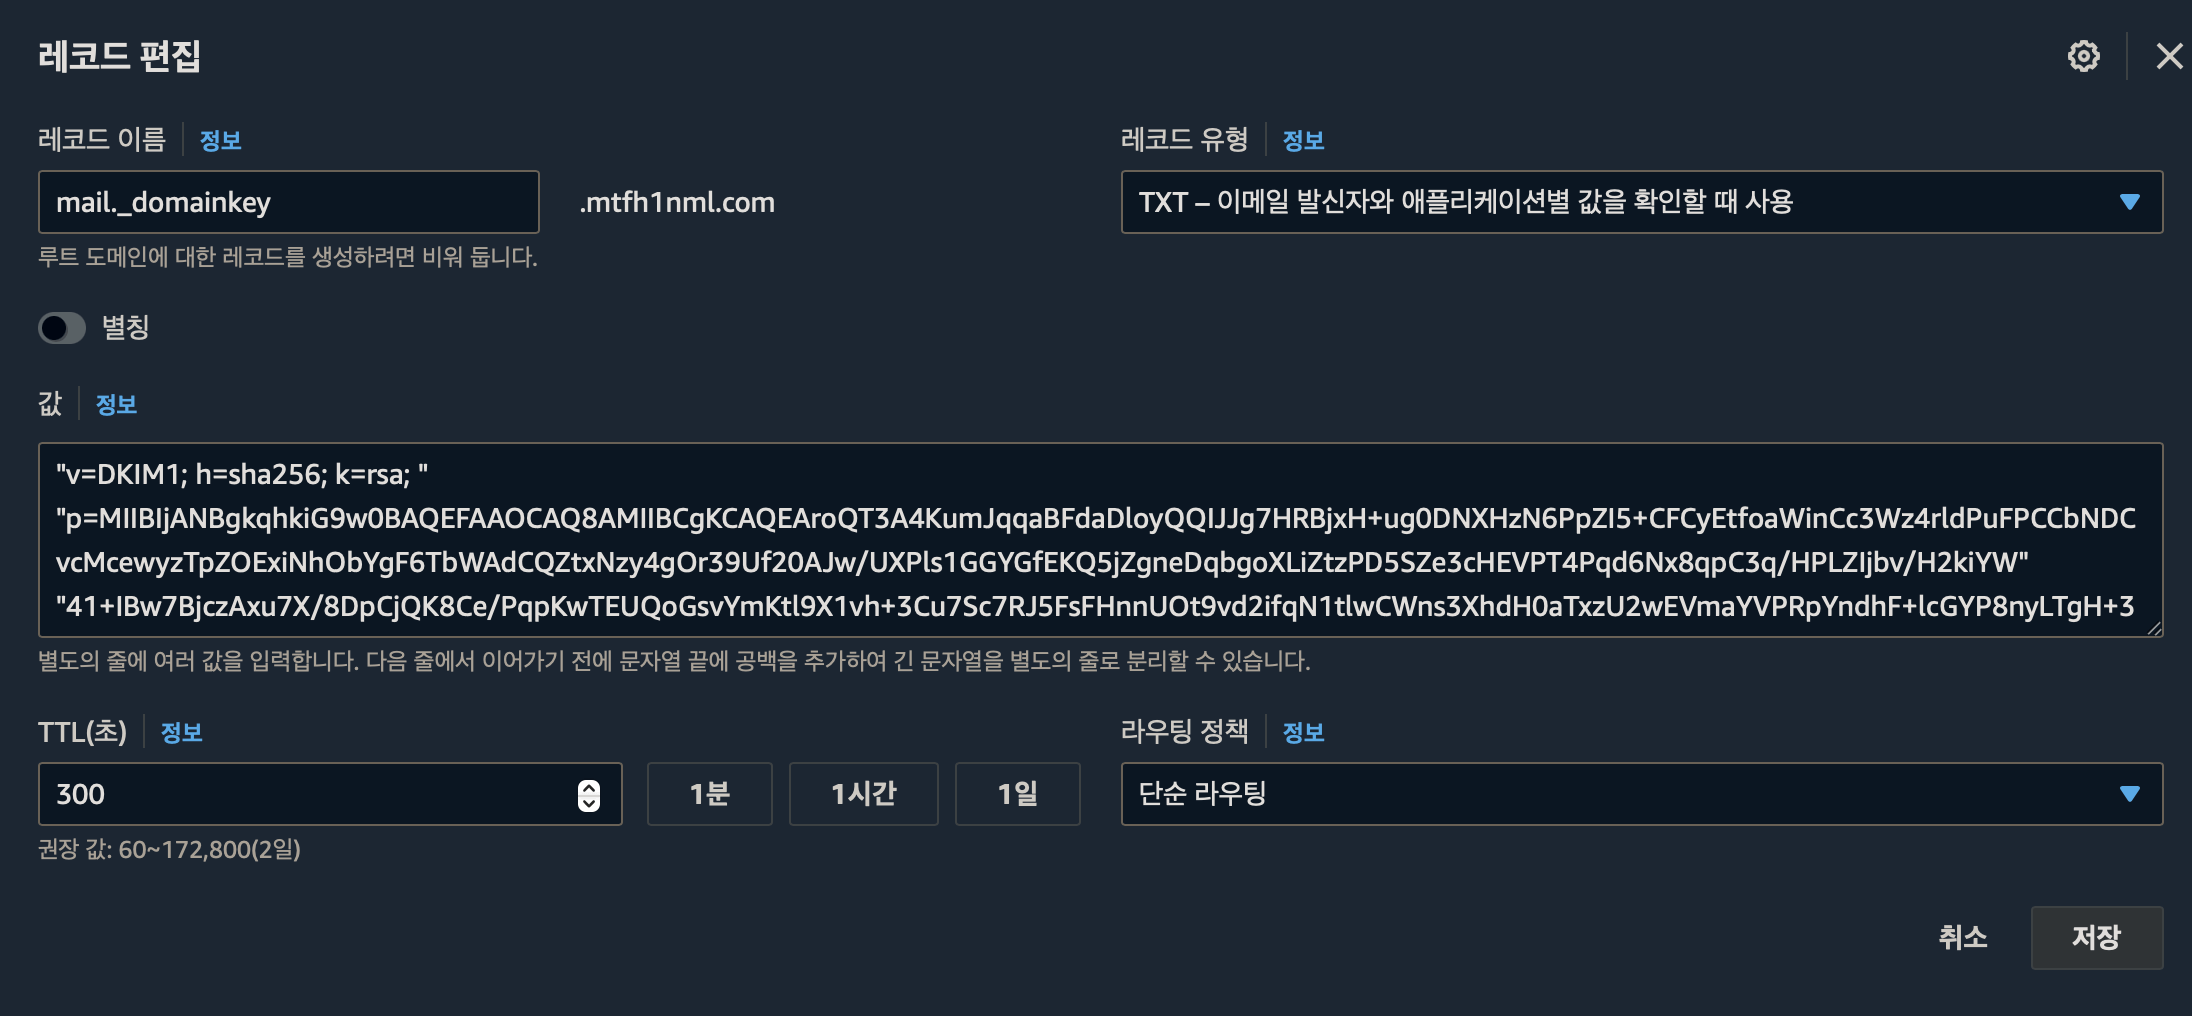
cat /etc/opendkim/mail.txt복사해서 다음과 같이 aws 에 record를 추가하자.
"v=DKIM1; h=sha256; k=rsa; " "p=MIIBIjANBgkqhkiG9w0BAQEFAAOCAQ8AMIIBCgKCAQEAroQT3A4KumJqqaBFdaDloyQQIJJg7HRBjxH+ug0DNXHzN6PpZI5+CFCyEtfoaWinCc3Wz4rldPuFPCCbNDCvcMcewyzTpZOExiNhObYgF6TbWAdCQZtxNzy4gOr39Uf20AJw/UXPls1GGYGfEKQ5jZgneDqbgoXLiZtzPD5SZe3cHEVPT4Pqd6Nx8qpC3q/HPLZIjbv/H2kiYW" "41+IBw7BjczAxu7X/8DpCjQK8Ce/PqpKwTEUQoGsvYmKtl9X1vh+3Cu7Sc7RJ5FsFHnnUOt9vd2ifqN1tlwCWns3XhdH0aTxzU2wEVmaYVPRpYndhF+lcGYP8nyLTgH+3cetDzgQIDAQAB"
sudo chown -R opendkim:opendkim /etc/opendkim
sudo nano /etc/opendkim.conf
아래와 같이 opendkim.conf 파일을 수정하자.
Autorestart             yes
AutorestartRate         10/1h
Syslog                  yes
SyslogSuccess           yes
LogWhy                  yes

Canonicalization        relaxed/simple
Mode                    sv
#SubDomains             no
OversignHeaders         From

UserID                  opendkim
UMask                   002

#Socket                 local:/run/opendkim/opendkim.sock
Socket                  inet:8891@localhost
#Socket                 inet:8891
#Socket                 local:/var/spool/postfix/opendkim/opendkim.sock

TrustAnchorFile         /usr/share/dns/root.key
#Nameservers            127.0.0.1

ExternalIgnoreList refile:/etc/opendkim/TrustedHosts
InternalHosts refile:/etc/opendkim/TrustedHosts
KeyTable refile:/etc/opendkim/KeyTable
SigningTable refile:/etc/opendkim/SigningTable
SignatureAlgorithm rsa-sha256sudo nano /etc/opendkim/TrustedHostsmtfh1nml.comsudo nano /etc/opendkim/KeyTablemail._domainkey.mtfh1nml.com mtfh1nml.com:mail:/etc/opendkim/dkim.privatesudo nano /etc/opendkim/SigningTable*@mtfh1nml.com mail._domainkey.mtfh1nml.comsudo systemctl restart postfix
sudo systemctl restart opendkimhttps://dmarcian.com/dkim-inspector/ 에 들어가서 domain: mtfh1nml.com, selector: mail 을 입력하면 설정이 잘 되었는지 확인할수 있다.
이제 mail을 보내보자.
/usr/sbin/sendmail kshxxthm@gmail.com
From: demo@mtfh1nml.com
Subject: Test
Test send mail dkim spf dmarc
ctrl+d 를 누르고 구글에서 메일이 inbox 들어와 있는지 확인하자.
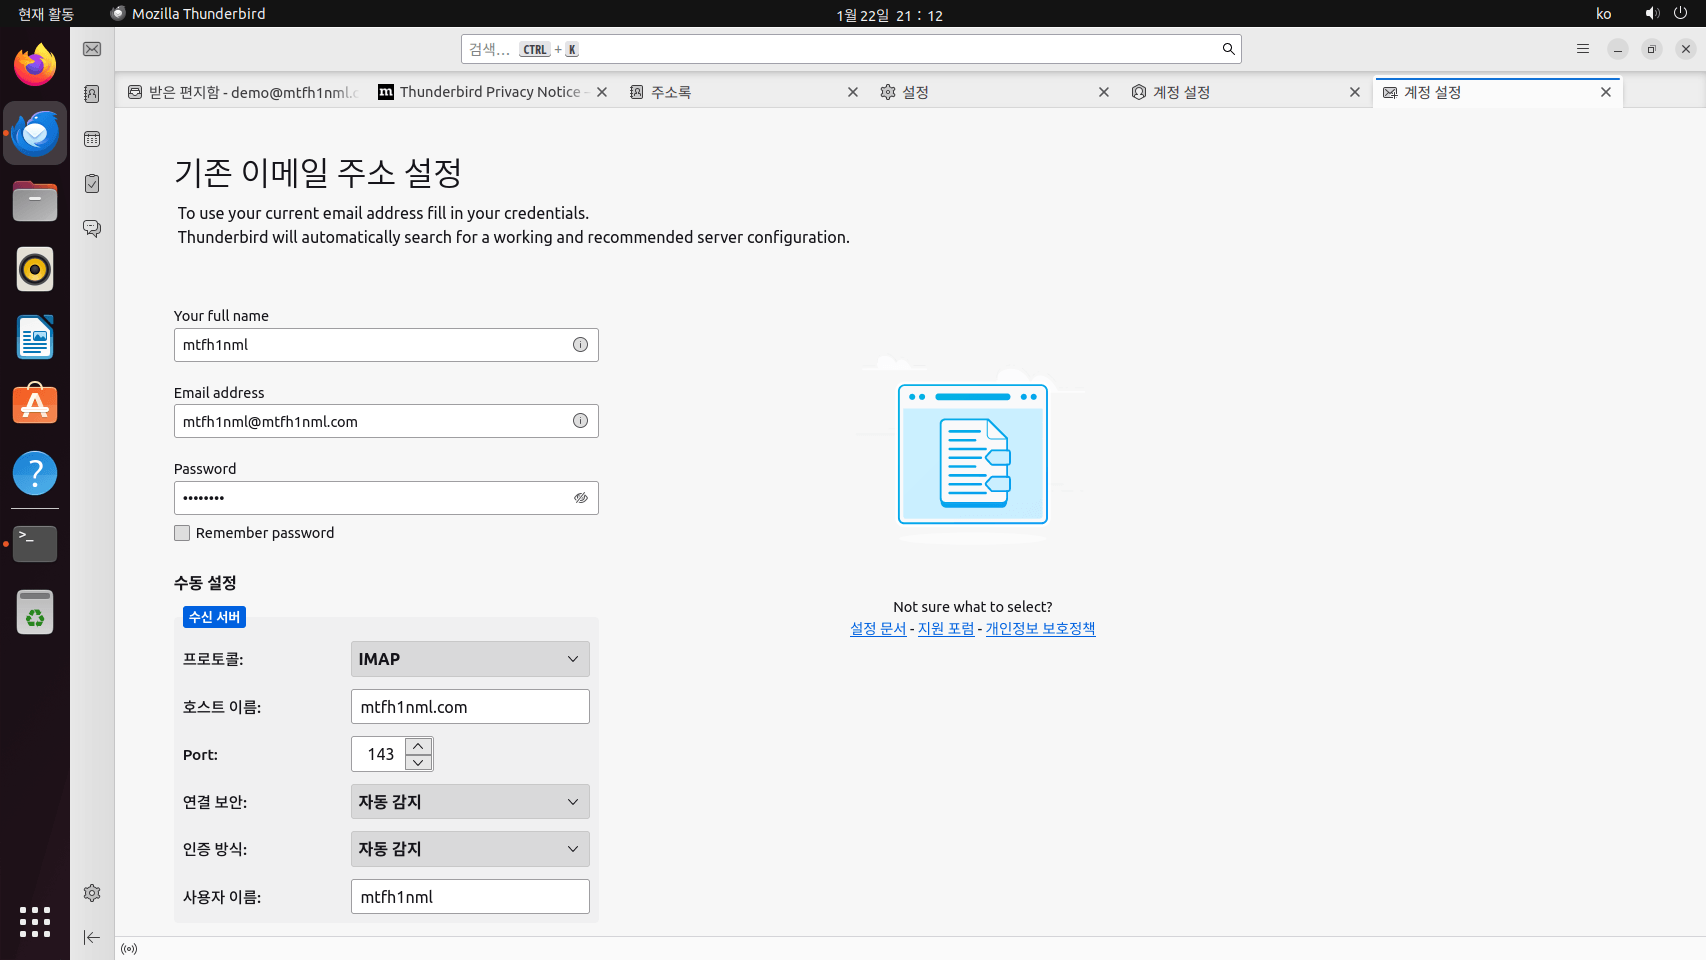
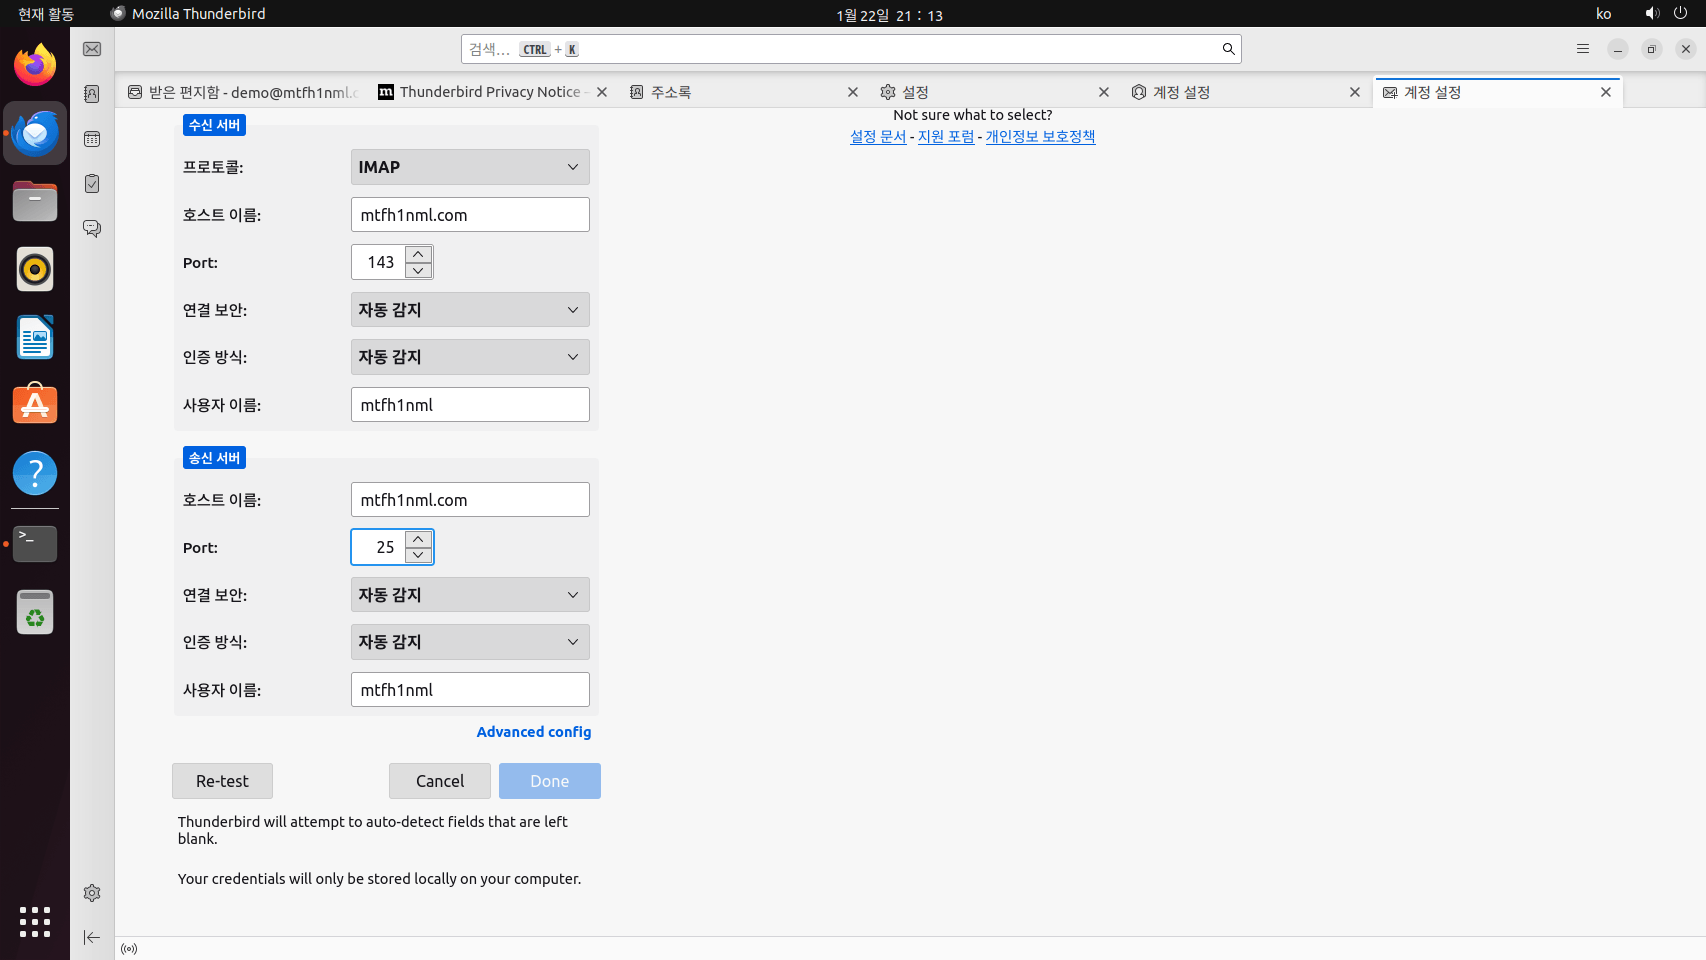
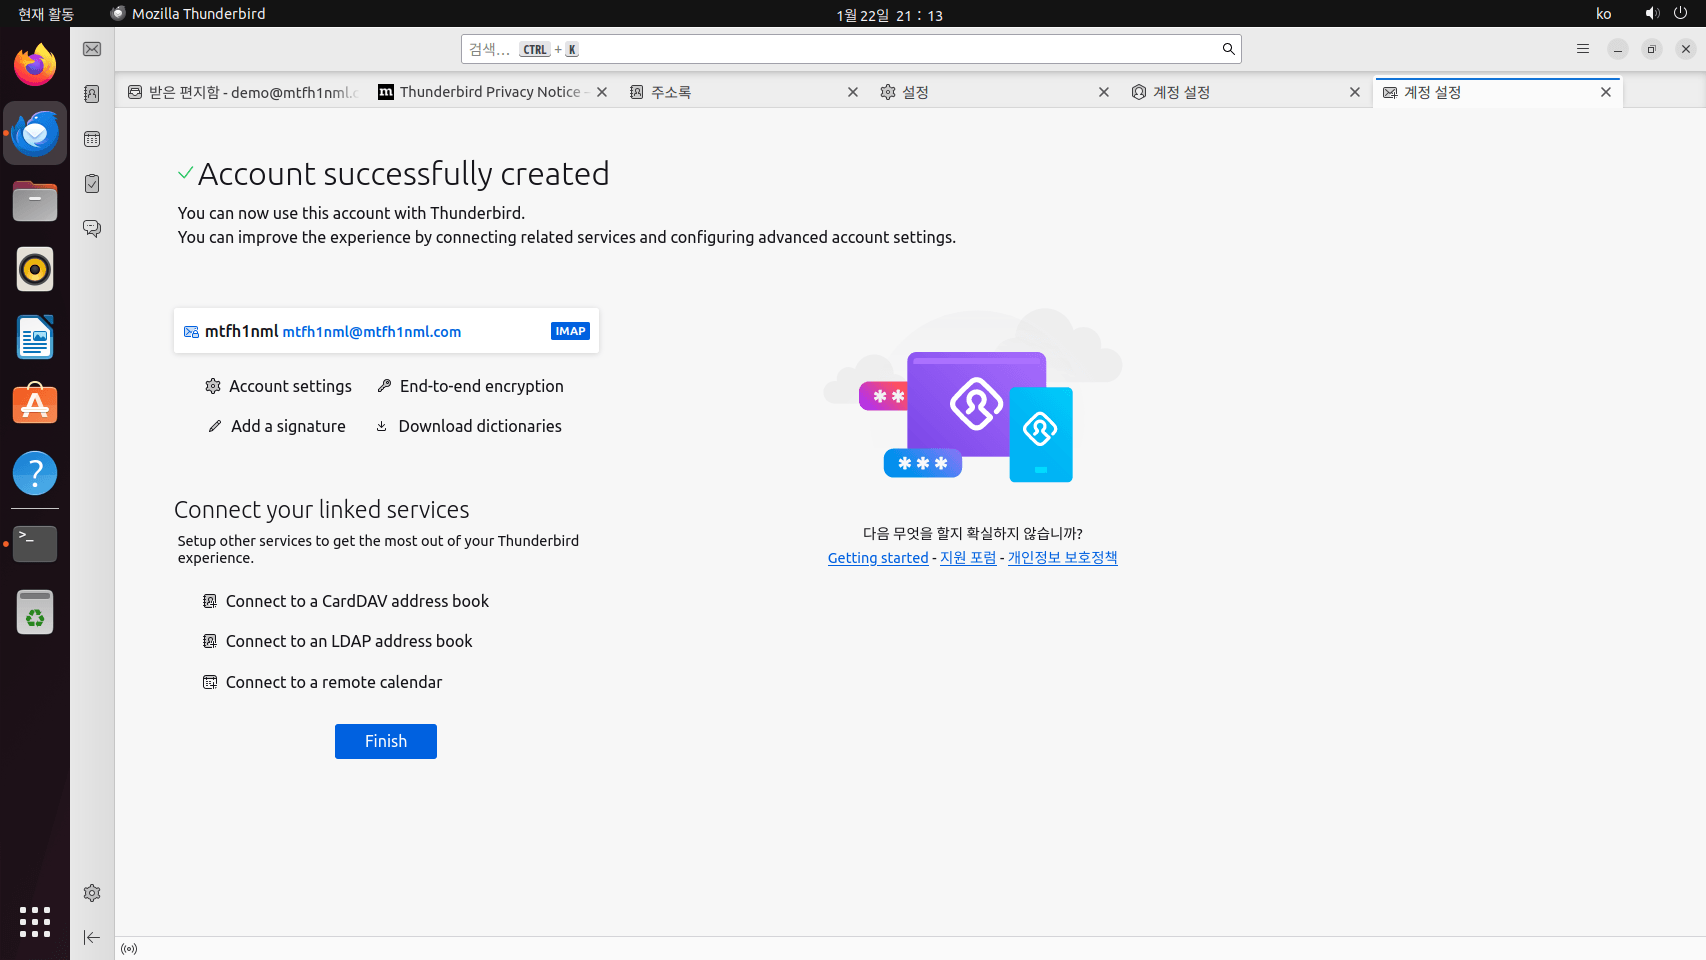
5. Mozilla Thunderbird
ubuntu 에 기본적으로 있는 메일 앱을 이용하자.
아래와 같이 설정하자.
Re-test 버튼을 누르자.
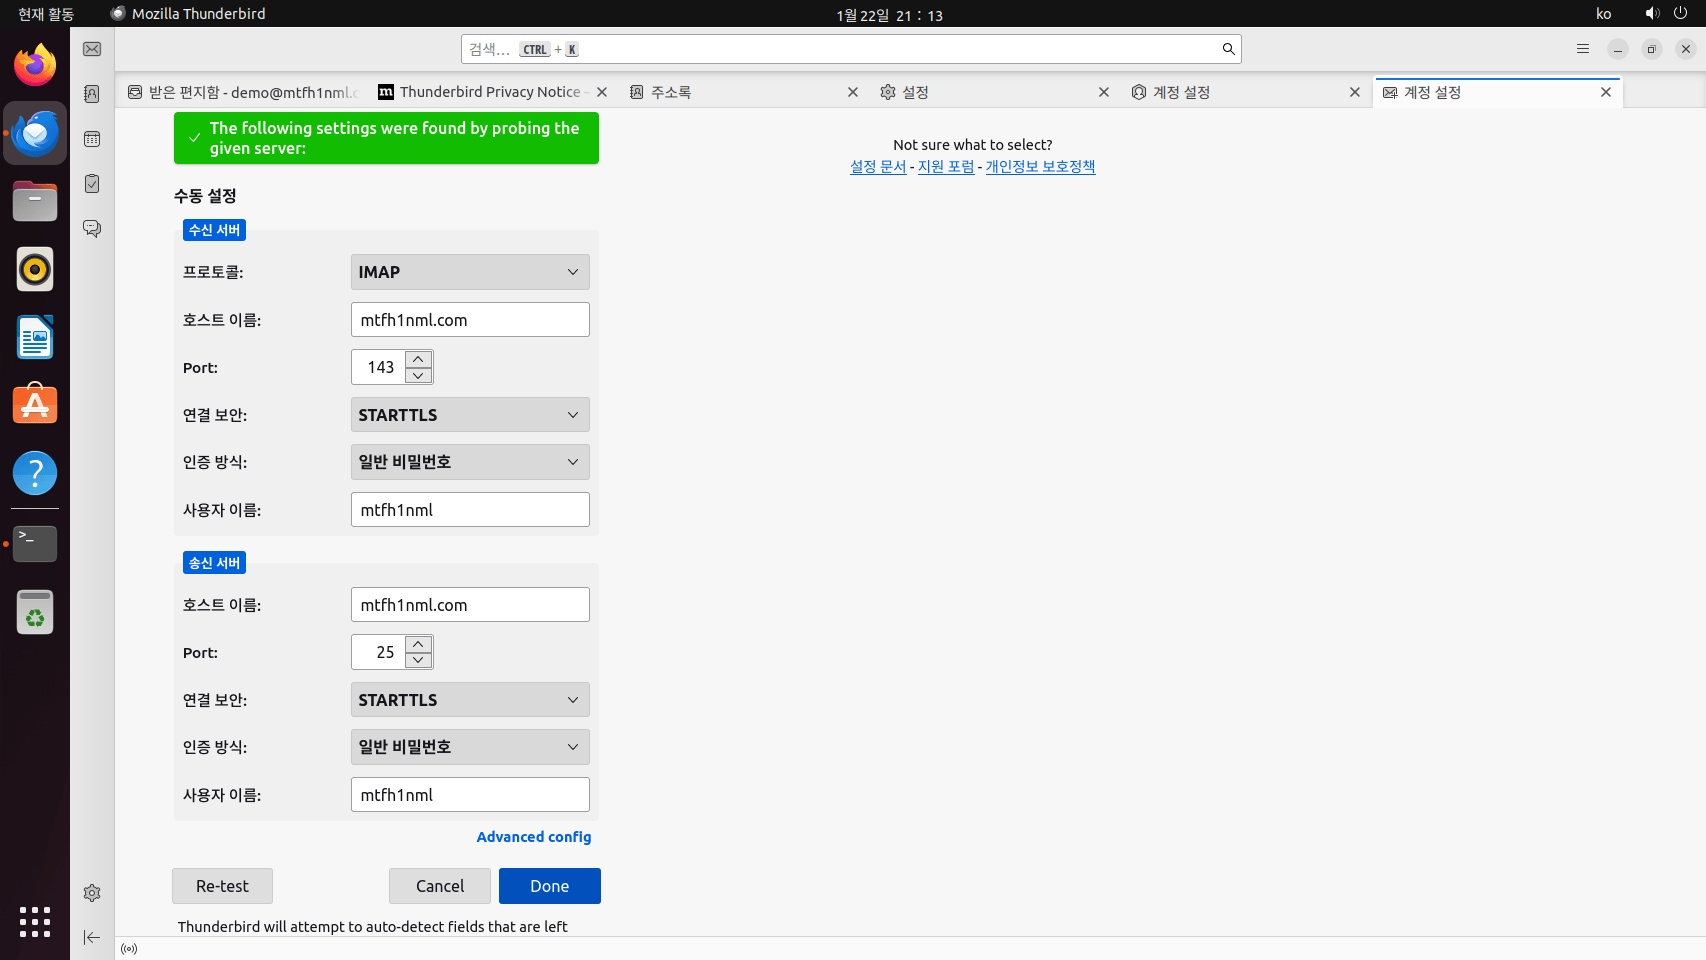
Done 버튼을 누르자.
6. postfix 명령어
postqueue -p메일 큐에 있는 메일을 검색한다.
sudo postsuper -d [메일 ID]특정 메일을 메일 큐에서 삭제한다.
sudo postsuper -d ALL메일 큐에있는 모든 메일을 삭제한다.
7. config 파일
- mtfh1nml.com 을 stmp로 이용할때
# See /usr/share/postfix/main.cf.dist for a commented, more complete version


# Debian specific:  Specifying a file name will cause the first
# line of that file to be used as the name.  The Debian default
# is /etc/mailname.
#myorigin = /etc/mailname

smtpd_banner = $myhostname ESMTP $mail_name (Ubuntu)
biff = no

# appending .domain is the MUA's job.
append_dot_mydomain = no

# Uncomment the next line to generate "delayed mail" warnings
#delay_warning_time = 4h

readme_directory = no

# See http://www.postfix.org/COMPATIBILITY_README.html -- default to 3.6 on
# fresh installs.
compatibility_level = 3.6


# TLS parameters
smtpd_tls_cert_file=/etc/ssl/certs/ssl-cert-snakeoil.pem
smtpd_tls_key_file=/etc/ssl/private/ssl-cert-snakeoil.key
smtpd_tls_security_level=may

smtp_tls_CApath=/etc/ssl/certs
smtp_tls_security_level=may
smtp_tls_session_cache_database = btree:${data_directory}/smtp_scache


smtpd_relay_restrictions = permit_mynetworks permit_sasl_authenticated defer_unauth_destination
myhostname = mtfh1nml.com
alias_maps = hash:/etc/aliases
alias_database = hash:/etc/aliases
myorigin = /etc/mailname
mydestination = mtfh1nml.com, mtfh1nml.com, localhost.com, , localhost

relayhost =
#smtp_sasl_auth_enable = yes
#smtp_sasl_password_maps = hash:/etc/postfix/sasl_passwd
#smtp_sasl_security_options = noanonymous
#sender_canonical_maps = regexp:/etc/postfix/sender_canonical
#smtp_tls_CAfile = /etc/ssl/certs/ca-certificates.crt
#smtp_use_tls = yes
#smtp_always_send_ehlo = yes
header_checks = regexp:/etc/postfix/header_checks

#smtp_tls_loglevel = 2
#smtp_sasl_loglevel = 2

#mynetworks = 127.0.0.0/8 [::ffff:127.0.0.0]/104 [::1]/128
mynetworks = 127.0.0.0/8 [::ffff:127.0.0.0]/104 [::1]/128 192.168.50.1
mailbox_size_limit = 0
recipient_delimiter = +
inet_interfaces = all
inet_protocols = all
home_mailbox = Maildir/- mtfh1nml.com 을 relay 서버로 해서 google stmp를 이용할때
# See /usr/share/postfix/main.cf.dist for a commented, more complete version


# Debian specific:  Specifying a file name will cause the first
# line of that file to be used as the name.  The Debian default
# is /etc/mailname.
#myorigin = /etc/mailname

smtpd_banner = $myhostname ESMTP $mail_name (Ubuntu)
biff = no

# appending .domain is the MUA's job.
append_dot_mydomain = no

# Uncomment the next line to generate "delayed mail" warnings
#delay_warning_time = 4h

readme_directory = no

# See http://www.postfix.org/COMPATIBILITY_README.html -- default to 3.6 on
# fresh installs.
compatibility_level = 3.6


# TLS parameters
smtpd_tls_cert_file=/etc/ssl/certs/ssl-cert-snakeoil.pem
smtpd_tls_key_file=/etc/ssl/private/ssl-cert-snakeoil.key
smtpd_tls_security_level=may

smtp_tls_CApath=/etc/ssl/certs
smtp_tls_security_level=may
smtp_tls_session_cache_database = btree:${data_directory}/smtp_scache


smtpd_relay_restrictions = permit_mynetworks permit_sasl_authenticated defer_unauth_destination
myhostname = mtfh1nml.com
alias_maps = hash:/etc/aliases
alias_database = hash:/etc/aliases
myorigin = /etc/mailname
mydestination = mtfh1nml.com, mtfh1nml.com, localhost.com, , localhost

relayhost = [smtp.gmail.com]:587
smtp_sasl_auth_enable = yes
smtp_sasl_password_maps = hash:/etc/postfix/sasl_passwd
smtp_sasl_security_options = noanonymous
sender_canonical_maps = regexp:/etc/postfix/sender_canonical
smtp_tls_CAfile = /etc/ssl/certs/ca-certificates.crt
smtp_use_tls = yes
smtp_always_send_ehlo = yes

smtp_tls_loglevel = 2
smtp_sasl_loglevel = 2

#mynetworks = 127.0.0.0/8 [::ffff:127.0.0.0]/104 [::1]/128
mynetworks = 127.0.0.0/8 [::ffff:127.0.0.0]/104 [::1]/128 192.168.50.1
mailbox_size_limit = 0
recipient_delimiter = +
inet_interfaces = all
inet_protocols = all
home_mailbox = Maildir/
SMTP 사용자 계정 정보를 생성한 후에 해시화 해야한다.
echo '[smtp.gmail.com]:587 <user>@<domain.com>:<password>' > /etc/postfix/sasl_passwd
postmap /etc/postfix/sasl_passwd
chmod 640 /etc/postfix/sasl_passwd*
릴레이 서버 설정이 끝났다면 도메인의 SPF도 업데이트 하자.
v=spf1 ip4:175.197.65.176 include:_spf.google.com -all- mtfh1nml.com 을 relay 서버로 해서 sendinblue stmp를 이용할때
# See /usr/share/postfix/main.cf.dist for a commented, more complete version


# Debian specific:  Specifying a file name will cause the first
# line of that file to be used as the name.  The Debian default
# is /etc/mailname.
#myorigin = /etc/mailname

smtpd_banner = $myhostname ESMTP $mail_name (Ubuntu)
biff = no

# appending .domain is the MUA's job.
append_dot_mydomain = no

# Uncomment the next line to generate "delayed mail" warnings
#delay_warning_time = 4h

readme_directory = no

# See http://www.postfix.org/COMPATIBILITY_README.html -- default to 3.6 on
# fresh installs.
compatibility_level = 3.6


# TLS parameters
smtpd_tls_cert_file=/etc/ssl/certs/ssl-cert-snakeoil.pem
smtpd_tls_key_file=/etc/ssl/private/ssl-cert-snakeoil.key
smtpd_tls_security_level=may

smtp_tls_CApath=/etc/ssl/certs
smtp_tls_security_level=may
smtp_tls_session_cache_database = btree:${data_directory}/smtp_scache


smtpd_relay_restrictions = permit_mynetworks permit_sasl_authenticated defer_unauth_destination
myhostname = mtfh1nml.com
alias_maps = hash:/etc/aliases
alias_database = hash:/etc/aliases
myorigin = /etc/mailname
mydestination = mtfh1nml.com, mtfh1nml.com, localhost.com, , localhost

relayhost = [smtp-relay.brevo.com]:587
smtp_sasl_auth_enable = yes
smtp_sasl_password_maps = hash:/etc/postfix/sasl_passwd
smtp_sasl_security_options = noanonymous
header_size_limit = 4096000
# sender_canonical_maps = regexp:/etc/postfix/sender_canonical
smtp_tls_CAfile = /etc/ssl/certs/ca-certificates.crt
smtp_use_tls = yes
smtp_always_send_ehlo = yes
header_checks = regexp:/etc/postfix/header_checks

smtp_tls_loglevel = 2
smtp_sasl_loglevel = 2

#mynetworks = 127.0.0.0/8 [::ffff:127.0.0.0]/104 [::1]/128
mynetworks = 127.0.0.0/8 [::ffff:127.0.0.0]/104 [::1]/128 192.168.50.1
mailbox_size_limit = 0
recipient_delimiter = +
inet_interfaces = all
inet_protocols = all
home_mailbox = Maildir/
SMTP 사용자 계정 정보를 생성한 후에 해시화 해야한다.
echo '[smtp-relay.brevo.com]:587 <user>@<domain.com>:<password>' > /etc/postfix/sasl_passwd
postmap /etc/postfix/sasl_passwd
chmod 640 /etc/postfix/sasl_passwd*
sendinblue 를 이용할때는 https://www.brevo.com 사이트로 가서 spf, dkim 정보를 검색해야 한다.
오른쪽 상단에서 My Account Dashboard 로 들어가서 Senders, Domains & Dedicated IPs > Domains Brevo code, DKIM record, DMARC record (Recommended) 정보를 복사해서 aws Route53 에서 업데이트 하자.
- postfix 에서 gophish X-Mailer 헤더 변경
/^X-Mailer: gophish/ REPLACE X-Mailer: Microsoft office outlook, build 17.551210Reference
- https://youtu.be/P5NeyiRPYiY?si=QVaEXgd-lUKOqEqR
- https://dmarcian.com/dkim-inspector/
- https://www.mail-tester.com
- https://easydmarc.com/tools/dmarc-lookup
- https://www.linuxbabe.com/mail-server/postfix-smtp-relay-ubuntu-sendinblue
- https://www.brevo.com
- https://malchooni.name/entry/홈서버-dovecot-pop3-imap-메일-서버-구축